项目技术栈
目前的计划是前端使用react,当前的后端是使用nodejs实现的,但是我们暂时还不打算重构后端,所以暂时不去动它。前端会用到下面这些技术(这里不光列出来直接和代码相关的库,还包括yarn、eslint这些开发过程中使用到的工具):
项目环境的搭建
我在家用的是windows进行开发,之前一直使用的是npm,但是既然yarn说起来是更好一些,那么我也尝试一下。这里推荐大家使用chocolatey来安装yarn,choco就和apt、brew等程序一样,是windows上的包管理工具,通过它我们可以很方便的安装一些工具。
1
2
| choco install yarn
# 安装完成之后需要重启一下命令行,重载环境变量
|
create react app
接着我使用了脚手架工具来快速的创建一个react项目,开发语言上我选择使用typescript,因为相对于纯js,还是ts要更适合较大一点的项目的开发以及多人的协作。需要注意的一点是,create react app这个脚手架帮我们将webpack这些细节都给隐藏了,如果之后我们需要自定义webpack的配置,则需要先eject。不过在我们的前期开发过程中应该是不涉及的。
1
| yarn create react-app example-ui --template typescript
|
这时我们已经可以使用 yarn run start 等命令了,create react app 这一脚手架已经帮我们初步配置好了 webpack-dev-server 等工具,我们可以直接使用,构建成功之后便可以直接在浏览器中访问。
dev server 反向代理
create react app新建出来的项目中包含了 webpack-dev-server,这是一个node实现的http程序,在项目构建之后我们能在浏览器中以 3000 端口访问页面正是因为它的存在。这个程序除了能作为静态文件服务器之外,还能够帮我们在开发阶段解决跨域的问题。虽然这个也可以通过服务器端设置CORS Header的方式来解决,但是本着都试一试的想法,我们先通过反向代理来解决这个问题。参考 Proxying API Requests in Development, 当前我们已经有一个已经实现的后端 https://example.com/api/ 我们要做的就是将对于 http://localhost:3000/api 的请求反带到已有的服务器上,这样的话我们就能以 /api/token 这样相对路径的形式来写网络请求了。在package.json里面加入了下面的字段,
1
| "proxy": "https://example.com"
|
并重新运行 yarn run start, 然后出错了…… 提示 Invalid options object. Dev Server has been initialized using an options object that does not match the API schema,查了半天,总算找到一个解决方案,在项目目录下新建一个 .env 文件,并在里面写入 DANGEROUSLY_DISABLE_HOST_CHECK = true. 最终才得以运行. 这个bug很久之前就有人提出了,但是不知道为什么一直没有修复,运行之后web服务器会自行识别非静态资源的请求并交给远端的服务器处理.
eslint
另外,为了让大家都保持较为一致的代码风格,这个项目中我加入了eslint,同时使用了airbnb的eslint配置。
1
2
3
4
5
| # 先使用下面的命令初始化一个 .eslintrc.js 配置文件
yarn add -D eslint
yarn run eslint --init
yarn add -D eslint-plugin-react@latest @typescript-eslint/eslint-plugin@latest @typescript-eslint/parser@latest
yarn add -D eslint-config-airbnb eslint-config-airbnb-typescript
|
当前使用的 .eslintrc.js 如下所示
 1
 2
 3
 4
 5
 6
 7
 8
 9
10
11
12
13
14
15
16
17
18
19
20
21
22
23
24
25
26
27
28
| module.exports = {
"env": {
"browser": true,
"es2021": true
},
"extends": [
"airbnb",
"airbnb/hooks",
"airbnb-typescript"
],
"ignorePatterns": [".eslintrc.js"],
"parser": "@typescript-eslint/parser",
"parserOptions": {
"ecmaFeatures": {
"jsx": true
},
"ecmaVersion": "latest",
"sourceType": "module",
"project": "./tsconfig.json",
"tsconfigRootDir": __dirname
},
"plugins": [
"react",
"@typescript-eslint"
],
"rules": {
}
}
|
除此之外,我编辑了vscode的配置,令其直接按照eslint来进行自动格式化,记得在vscode里面也安装一下eslint插件。
1
2
3
4
5
6
7
| {
// ...
"eslint.format.enable": true,
"editor.codeActionsOnSave": {
"source.fixAll.eslint": true
}
}
|
mui
接着我们要引入我们准备使用的组件库 mui 以及 styled-components
1
2
3
| yarn add @mui/material @emotion/react @emotion/styled @mui/styled-engine-sc styled-components
# 并安装一下图标库
yarn add @mui/icons-material
|
并尝试着添加一个组件(看来大家都很喜欢在测试的时候用官方的这个示例,copilot一下就猜出来我想写什么了)
1
| <Button variant="contained">Hello World</Button>
|

上传至github
在github上建立对应的项目之后,将项目上传到github上(记得配置好.gitignore)
1
2
3
4
5
| git init
git add *
git commit -m "init"
git remote add origin git@github.com:haojie06/example.git
git push -u origin main
|
我使用的 .gitignore 模板
 1
 2
 3
 4
 5
 6
 7
 8
 9
10
11
12
13
14
15
16
17
18
19
20
21
22
23
24
25
26
27
28
29
30
31
32
33
34
35
| # Logs
logs
*.log
npm-debug.log*
yarn-debug.log*
yarn-error.log*
# Compiled binary addons (http://nodejs.org/api/addons.html)
build/Release
# Dependency directories
node_modules/
jspm_packages/
# Distribution directories
dist/
# Typescript v1 declaration files
typings/
# Optional npm cache directory
.npm
# Optional eslint cache
.eslintcache
# Optional REPL history
.node_repl_history
# Output of 'npm pack'
*.tgz
# Yarn Integrity file
.yarn-integrity
|
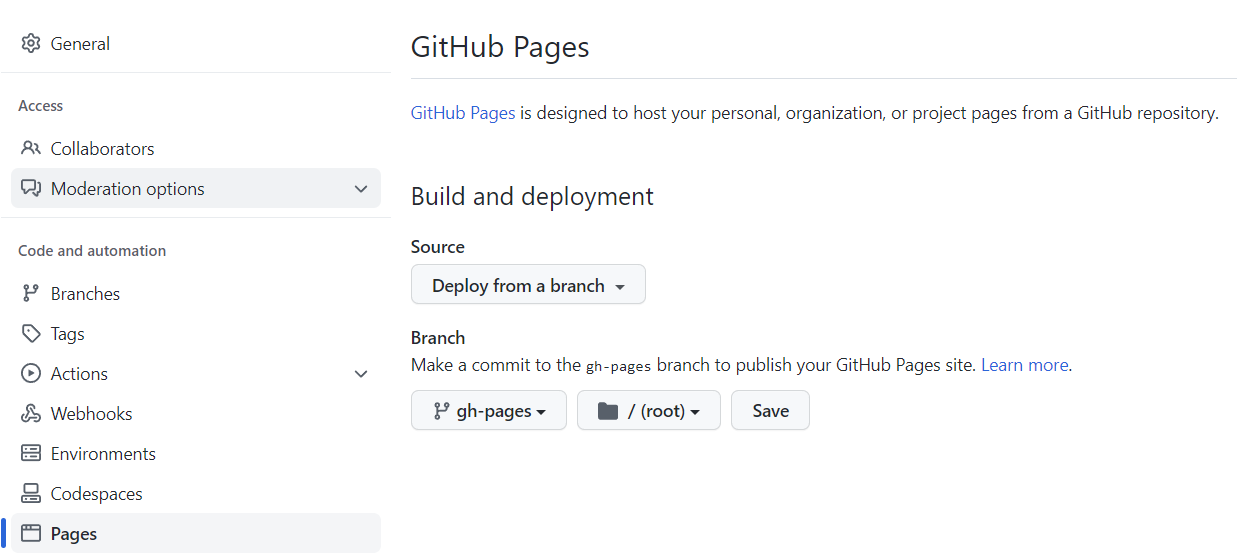
将项目部署到github pages
我们可以直接将项目通过github actions构建出来,并发布到github pages上,这样每次合并到主分支后,我们都能在github pages上看见最新的页面。在根目录下新建 .github/workflows 目录,并新建一个 deploy-gh-pages.yml 文件,内容如下:
 1
 2
 3
 4
 5
 6
 7
 8
 9
10
11
12
13
14
15
16
17
18
19
20
21
22
23
24
25
26
27
| # https://github.com/marketplace/actions/deploy-to-github-pages
name: build-and-deploy-to-gh-pages
on:
push:
branches:
- main
permissions:
contents: write
jobs:
build-and-deploy:
concurrency: ci-${{ github.ref }} # Recommended if you intend to make multiple deployments in quick succession.
runs-on: ubuntu-latest
steps:
- name: Checkout 🛎️
uses: actions/checkout@v3
- name: Install and Build 🔧 # This example project is built using npm and outputs the result to the 'build' folder. Replace with the commands required to build your project, or remove this step entirely if your site is pre-built.
run: |
cd example-ui
npm ci
npm run build
- name: Deploy 🚀
uses: JamesIves/github-pages-deploy-action@v4
with:
branch: gh-pages # The branch the action should deploy to.
folder: example-ui/build # The folder the action should deploy.
|
总结
万事开头难,开启一个前端项目尤其的难,每次新建一个前端项目并安装各种依赖、解决bug我都要花掉许多的时间,因此我也希望能够通过将过程记录下来以供未来的自己或者是他人参考。不过感觉到这里还有很多没有配置好的东西,比如后面的 react-router、webpack-dev-server对于后端api的反向代理以及ci/cd的github actions等等,前方大概还有一大堆的坑要去摸索,这些在后面用到的时候再配置啦。